Fingerprint Reindeer Card
Transform thumbprints into adorable Rudolph and his reindeer friends. This kid-friendly craft is perfect for classroom parties, family craft nights, or making personalized cards that grandparents will treasure forever.
Materials Needed
- White or cream cardstock (folded in half for the card)
- Brown ink pad or washable brown paint
- Black fine-tip marker
- Red marker, paint, or small red pom-poms
- Baby wipes or damp cloth for cleanup
- Optional: googly eyes
- Optional: gold or silver pen for accents
This post contains affiliate links. We may earn a commission at no extra cost to you.
This fingerprint reindeer card transforms a simple thumbprint into adorable Rudolph and his reindeer friends. Perfect for toddlers through early elementary ages, this craft captures a moment in time that becomes a treasured keepsake for grandparents and family.
Why Fingerprint Reindeer Cards Are Priceless Keepsakes
Fingerprint crafts capture a moment in time that you can never get back. Those tiny thumbprints from a 3-year-old become a priceless keepsake as the years pass — parents and grandparents will look at these cards years later and marvel at how small those fingers once were. There's something deeply personal and touching about seeing the actual size of a child's thumb pressed into the paper.
Beyond sentimentality, fingerprint art is incredibly accessible. Even toddlers who struggle with scissors and precise gluing can press a finger into paint and stamp it on paper with satisfying results. The technique builds fine motor control while keeping frustration low, making it perfect for classroom settings where you need consistent success across varying skill levels.
These cards work beautifully for any recipient — distant relatives who don't get to see the children often, teachers receiving thank-you cards, or neighbors getting holiday greetings. Pair them with other easy Christmas crafts for kids like our paper plate snowman for a full crafting session.
Perfect for Classroom and Party Activities
This craft shines in group settings because it's quick, inexpensive, and produces results that every child can be proud of. A classroom of 25 kids can make cards in about 30 minutes with minimal adult supervision once the initial stamping is done.
The materials cost pennies per card — one ink pad can serve dozens of children, and cardstock bought in bulk is extremely affordable. For holiday parties or classroom gift-making, this project delivers maximum impact with minimum budget and preparation time.
For teachers and party planners, set up an assembly line with one station for stamping thumbprints (adult-supervised), a drying station, and a decoration station with markers and embellishments. This keeps traffic flowing and prevents the chaos of 20 kids crowding one ink pad.
Essential Supplies for Fingerprint Reindeer Cards
The beauty of this craft is that you need very few supplies, and they're all affordable and reusable. Here's what works best:
Paper: Cardstock That Can Handle Ink
Regular printer paper is too thin and will wrinkle with ink or paint. Use 80-110 lb white cardstock for professional results. For an elegant look, try cream or ivory cardstock — the warmer tone makes the brown reindeer really pop.
Pre-folded blank greeting cards with envelopes save time and ensure perfect sizing. A2 size (4.25 x 5.5 inches folded) is standard for greeting cards and fits in widely-available envelopes.
Ink Pads: Washable and Kid-Friendly
Brown ink is essential for the reindeer body. Washable brown ink pads are perfect for young kids — they create clean prints and wash off hands easily with soap and water.
For classrooms managing 20+ kids, a set of washable rainbow ink pads allows for creative variations — red, green, and brown for Christmas-themed fingerprint art beyond just reindeer.
If using paint instead of ink, washable tempera paint in brown works well. Pour a small amount on a sponge in a shallow dish for easy stamping.
Markers for Details
Fine-tip permanent markers in black are essential for drawing antlers and facial features. Sharpie makes ultra-fine point markers perfect for small details on kid crafts.
For Rudolph's red nose, use a red permanent marker or a red paint pen for a brighter, more opaque color.
Embellishments (Optional but Fun)
Mini googly eyes (6mm or 8mm) add personality and movement to the reindeer faces. Kids love the 3D effect.
Tiny red pom-poms (5mm or 10mm) make excellent Rudolph noses with real texture. Use white craft glue or glue dots to attach them.
Metallic gel pens in gold and silver let kids add stars, snowflakes, or decorative borders for extra flair.
Cleanup Supplies
Baby wipes or wet wipes make finger cleanup fast and easy. Keep a stack at each crafting station.
A plastic tablecloth protects your work surface and makes post-craft cleanup as simple as rolling up and wiping down.
How to Make Fingerprint Reindeer Cards
Follow these simple step-by-step instructions to create adorable reindeer Christmas cards that kids will be proud to give and recipients will treasure forever.
Step 1: Prepare Your Workspace
Cover your work surface with newspaper or a plastic tablecloth to protect from ink and paint. Have baby wipes or a damp cloth ready for quick cleanup — fingerprint crafts inevitably mean messy fingers. If using multiple children, set up an assembly line with one adult managing the ink pad and another helping with decoration.
Fold your cardstock in half to create the card base before starting. This prevents the hassle of folding later when the ink or paint might smudge. Use a bone folder or the back of a spoon to create a crisp, professional fold line.
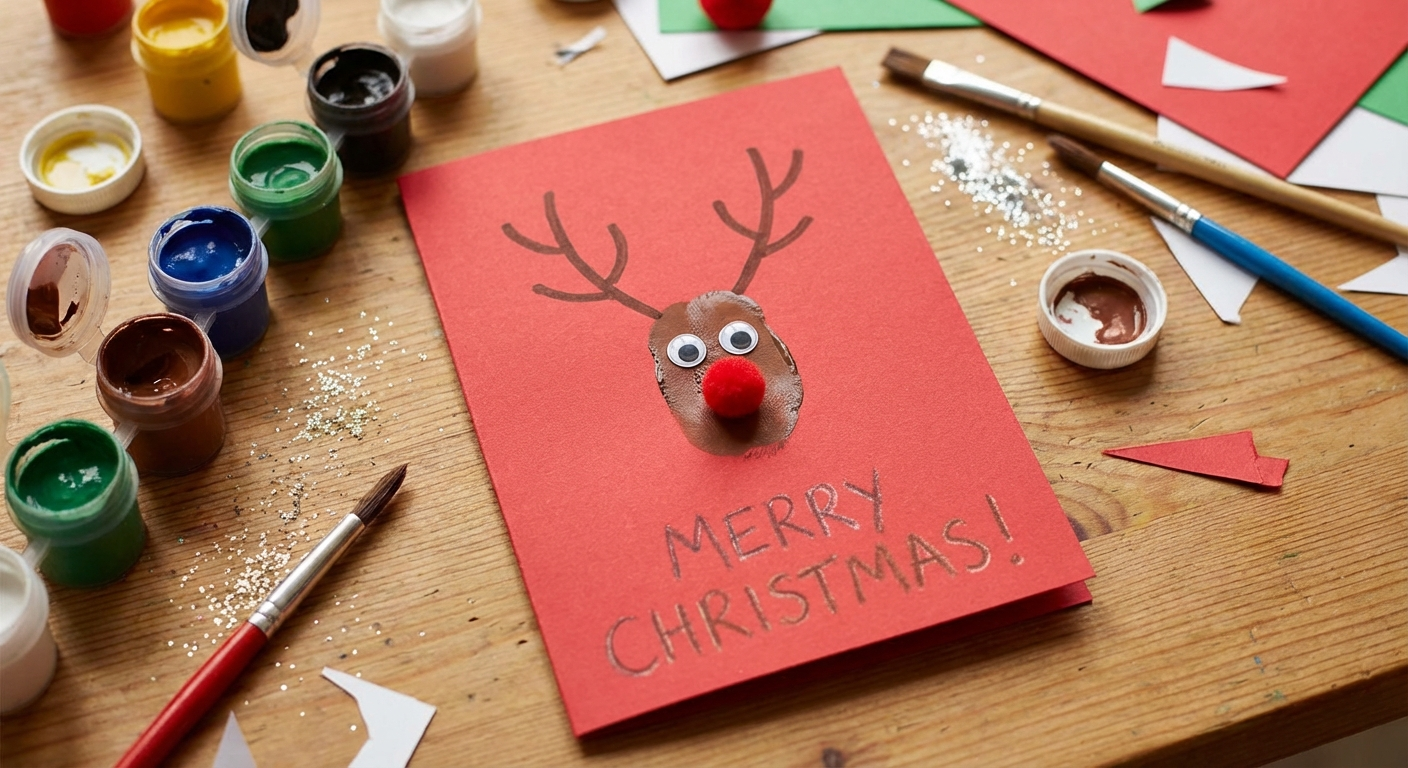
Step 2: Create the Reindeer Face
Press a thumb firmly into the brown ink pad or paint, making sure the entire pad of the thumb is covered. Stamp it onto the front of the card where you want the reindeer's face to appear. Apply even pressure and lift straight up for a clean print without smearing.
You can make one large reindeer as a focal point, or create a whole team of tiny reindeer marching across the card. For Rudolph's full team, you'd need nine reindeer (plus Rudolph makes ten — Dasher, Dancer, Prancer, Vixen, Comet, Cupid, Donner, Blitzen, and Rudolph). Wipe the thumb clean immediately before the ink dries on the skin.
For very young children (ages 3-4), help guide their hand to press firmly and lift straight up. The first few attempts may be smudgy — have extra cardstock ready for practice and do-overs.
Step 3: Let the Thumbprint Dry Completely
This is the hardest part for impatient little ones, but it's crucial. Ink takes about 2 minutes to dry; paint takes 5-10 minutes depending on thickness. Touching wet ink creates smudges that ruin the clean fingerprint shape.
Use this drying time productively: talk about what the reindeer will look like, practice drawing antlers on scrap paper, or have kids wash their hands while the prints dry.
Step 4: Add the Antlers
Once the brown thumbprint is completely dry, use a black fine-tip marker to draw V-shaped antlers extending from the top of the thumbprint. Each antler should have a main branch with 2-3 smaller branches coming off for a realistic look.
Don't overthink it — rustic, slightly wobbly antlers add charm and handmade character. Perfectly straight antlers look less authentic anyway. Kids love seeing their drawings turn into recognizable reindeer. For very young children, you may need to draw the antlers for them while they watch.
Step 5: Create the Face Features
Draw two small dots for eyes using the black marker. For Rudolph, add his famous red nose using a red marker, red paint dot, or glue on a tiny red pom-pom for a 3D effect that really pops. For the other reindeer in Santa's team, use a black dot for the nose instead of red.
Draw a small curved line for a smiling mouth if desired. Some kids prefer to add googly eyes instead of drawn ones for extra personality and movement — just dab a tiny dot of white glue on the back and press into place.
Step 6: Add Decorations and Details
Use a gold or silver gel pen to add snowflakes, stars, or a simple border around the reindeer to make the card feel more festive. You can also stamp additional thumbprints around the edges and turn them into ornaments, snowmen, or little Christmas trees for a fuller, more elaborate design.
Some children enjoy adding falling snow with white paint dots (use a Q-tip dipped in white paint) or drawing a winter landscape beneath the reindeer with blue sky and white ground. Let their creativity guide the final touches.
Step 7: Write a Personal Message
On the inside of the card, have the child write their name and age, or help them trace letters if they're too young to write independently. Including the year and the child's age makes the card a dated keepsake: "Made with love by Emma, age 4, 2026."
For preschoolers, a simple "Merry Christmas from [Name]" works perfectly. The fingerprint itself is the real gift — the message is just context. Parents can write the message for children too young to write, but let the child sign their own name (even if it's just scribbles — that's part of the keepsake).
Age-Specific Modifications
This craft works for a wide age range, but here's how to adapt it for different developmental stages:
Ages 2-3: Toddler Version
Keep it ultra-simple. Just the thumbprint and red nose — skip the antlers entirely. The brown oval with a red dot is recognizable enough as Rudolph. Adults can write "Rudolph loves you!" inside for the child. Focus on the sensory experience of stamping and the pride of creating something.
Ages 4-6: Preschool/Kindergarten
This is the sweet spot for this craft. Kids can stamp their own thumbprints, adults can help draw antlers, and children can add eyes and noses with markers. They can dictate messages for adults to write, or trace their own names if working on letter formation.
Ages 7-10: Elementary
Older kids can execute the entire craft independently and may enjoy adding elaborate backgrounds, multiple reindeer, or creative variations. Challenge them to create a whole scene — Santa's sleigh being pulled by all nine reindeer across the sky, with a moon and stars background.
Ages 10+: Pre-Teen/Teen
At this age, fingerprint reindeer might seem "babyish," but repositioning it as "keepsake art for grandparents" or a charitable activity (making cards for nursing homes) can re-engage interest. Teens can also mentor younger siblings or cousins through the process, which builds leadership skills.
Classroom Setup Guide for Teachers
Planning to do this craft with a full classroom? Here's how to orchestrate it smoothly:
Materials Needed for 25 Students
- 25 sheets of cardstock (buy a 50-sheet pack for extras and mistakes)
- 2-3 brown ink pads (rotate between students)
- 25 black fine-tip markers (or share 10 markers between pairs)
- 5-10 red markers for Rudolph noses
- Container of baby wipes for cleanup
- Optional: 100-pack of googly eyes, bag of mini red pom-poms
Time Breakdown (45-Minute Session)
- 5 minutes: Introduction and example demonstration
- 10 minutes: Stamping thumbprints (rotate students through ink pad stations)
- 5 minutes: Drying time (read a Christmas story or sing songs)
- 15 minutes: Drawing antlers and details
- 5 minutes: Writing messages inside cards
- 5 minutes: Cleanup and admiring each other's work
Assembly Line Stations
Station 1 (Adult-supervised): Ink pad stamping. Adult ensures proper technique and wipes thumbs clean immediately. 3-5 students at a time.
Station 2 (Independent): Drying area. Students place cards flat on a designated table and wash hands. No touching the cards!
Station 3 (Adult or teen helper): Antler drawing. Adult can assist younger students with antler shapes or let older students work independently.
Station 4 (Independent): Detail decoration. Markers, googly eyes, pom-poms, and stickers available for final touches.
Troubleshooting Common Problems
Problem: Smudgy, Blurry Thumbprints
Cause: Moving the thumb while it's pressed to the paper, or using too much ink/paint.
Fix: Practice the "press and lift" motion on scrap paper first. Press straight down, hold for 1-2 seconds without moving, lift straight up. If using paint, dab off excess on a paper towel before stamping.
Problem: Ink Won't Wash Off Hands
Cause: Using permanent ink instead of washable ink.
Fix: For stubborn ink stains, rub hands with a bit of cooking oil or hand sanitizer before washing with soap. Always use washable, non-toxic ink pads labeled "for kids."
Problem: Antlers Look Like Scribbles
Cause: Motor control challenges in very young children.
Fix: For ages 2-4, adults can draw the antlers while the child watches and learns. By age 5-6, most kids can draw recognizable V-shapes with branches. Embrace the wobbly charm — it's part of the keepsake.
Problem: Card Won't Fold Neatly
Cause: Trying to fold thick cardstock without scoring.
Fix: Use a bone folder, butter knife edge, or the back of a spoon to score the fold line before creasing. This prevents cracking and creates a crisp edge.
Expert Tips for Perfect Fingerprint Cards
After making hundreds of fingerprint cards with children of all ages, here are the tips that make the biggest difference:
- Ink pads work better than paint: While paint creates vibrant prints, brown ink pads produce cleaner, more consistent results with significantly less mess. Washable ink pads exist if you're worried about stained fingers.
- Practice makes perfect: Have kids practice their thumbprint technique on scrap paper first. They'll learn how much pressure to apply and how to lift straight up for clean prints without smudges.
- Keep it simple for young kids: For children under 5, skip the antlers and just add eyes and a red nose. The thumbprint alone is recognizable and charming.
- Batch production strategy: Making cards for the whole class or all the grandparents? Create an assembly line: stamp day 1, drying overnight, decoration day 2. This prevents impatience and smudging.
- Envelope sizing: A standard A7 envelope (5.25 x 7.25 inches) fits a half-sheet of letter-sized cardstock folded in half — perfect for mailing to faraway relatives.
- Document the moment: Take a photo of the child making the card with their paint-covered thumb held up proudly. Include a small print inside the envelope as a bonus gift that shows the process behind the art.
- Quality cardstock matters: Thin paper wrinkles when wet. Use 80-110 lb cardstock for professional-looking cards that mail well and feel substantial.
- Name and date every card: Write the child's name, age, and year on the back of each card. In 10 years, you'll be grateful for this documentation.
Creative Fingerprint Art Variations
Once you've mastered the basic fingerprint reindeer, try these other fingerprint designs to create a variety of handmade Christmas cards:
Fingerprint Christmas Tree
Make an upside-down triangle of green fingerprints (or thumbprints for larger trees) arranged in 3-4 rows. Add a brown rectangle trunk at the bottom. Top with a yellow star. Add tiny dots of color for "ornaments" on each fingerprint branch.
Fingerprint String Lights
Stamp colored fingerprints in a curved line across the card (red, green, yellow, blue pattern) and connect them with a drawn black string for Christmas light strands. Use rainbow colors for visual impact. This looks especially festive across the top of a card with "Happy Holidays!" written below.
Full Hand Reindeer
For bigger kids, trace their whole hand with fingers spread and turn it into a reindeer face with the thumb as Rudolph's red nose and the fingers as antlers. This creates a larger keepsake that shows hand size even more dramatically than a thumbprint.
Santa Fingerprint
Use a pink or peach thumbprint for Santa's face, add a red triangle "hat" at the top, white paint or marker for his fluffy beard and hat trim, and black dots for eyes. A tiny black dot can be his belt buckle below the face.
Snowman Trio
Stack three white thumbprints vertically and add coal eyes (black dots), carrot noses (orange triangles), and stick arms (brown lines) for a classic snowman design. Add a top hat and scarf for personality.
Ornament Fingerprints
Make colorful thumbprints in rows and add a drawn string at the top of each one to look like hanging ornaments on the tree. Use metallic gel pens for the strings for extra sparkle.
Preserving and Displaying Fingerprint Cards
These cards are too precious to store in a box and forget. Here are ways to preserve and display them:
Framing for Display
Slide the card into a 5x7 frame and display it on a mantel or shelf. Change out the cards annually to show progression. Some grandparents frame every year's card in matching frames lined up chronologically — the visual timeline is stunning.
Creating a Memory Book
Use a scrapbook or photo album specifically for handmade cards. Add the card to a page each year with a photo of the child at that age. By age 18, you have a complete visual record of their growth.
Laminating for Longevity
For cards you want to preserve indefinitely, use a laminator or self-adhesive laminating sheets. This protects against fading, moisture, and handling damage. Laminated cards can even become ornaments with a hole punch and ribbon.
Scanning for Digital Backup
Scan or photograph each card before giving it away. Store digital copies in a dedicated folder organized by year. This creates a backup if the physical card is lost and allows you to create photo books or prints later.
Cost Breakdown: Homemade vs Store-Bought
Let's look at the real economics of fingerprint cards:
Supplies for 20 Cards
- Cardstock (20 sheets): $4-6
- Brown ink pad: $4-6 (reusable for years)
- Black fine-tip markers (pack of 12): $8-12 (reusable)
- Red marker: $1-2 (reusable)
- Optional: Googly eyes and pom-poms: $5-8 (hundreds per pack)
First batch total: $17-34 for 20 cards ($0.85-1.70 per card)
Second batch onward: $4-6 for 20 cards ($0.20-0.30 per card) — only need new cardstock
Store-Bought Comparison
- Generic boxed Christmas cards: $0.50-1.50 per card
- Premium photo cards online: $2-4 per card
- Handmade artisan cards: $5-8 per card
The verdict: Fingerprint cards cost about the same as premium photo cards for the first batch, then drop to $0.20-0.30 per card for future batches. But the sentimental value is priceless — no store-bought card can compete with a grandchild's actual thumbprint preserved in ink.
Making Fingerprint Cards a Holiday Tradition
Many families make fingerprint cards an annual tradition, creating one set for grandparents every Christmas. Over the years, the progression is remarkable — you can see how much the child has grown just by comparing the size of their thumbprints year over year.
Some families create a "fingerprint album" where grandparents collect every year's card in a special binder. By the time the child graduates high school, there's a complete timeline of their growth captured in those tiny brown thumbprints that became reindeer.
This tradition works especially well for families separated by distance. Grandparents in other states or countries treasure these cards because they include something tangible from the child — not just a generic store-bought card with a signature, but an actual physical imprint of their grandchild's hand at this exact age.
Start the tradition this year, even if your child is a teenager. In 20 years, that "last" fingerprint card from age 15 will be just as precious as the first one from age 3.
Pairing Fingerprint Cards with Other Gifts
Fingerprint reindeer cards make wonderful accompaniments to other homemade gifts. Here are thoughtful pairing ideas:
- With homemade ornaments: Pair the card with a salt dough ornament or felt Christmas tree that the child also made for a complete handmade gift set.
- With baked goods: Attach the card to a tin of homemade gingerbread cookies or peppermint bark for a gift from both the kitchen and craft table.
- With photo gifts: Include the card with a framed photo of the child for a double keepsake gift grandparents will display year-round.
- With handmade crafts: Bundle several handmade items together — the card, a popsicle stick reindeer ornament, and a small handmade wreath for a basket of handmade Christmas treasures.
- With charitable donations: For adults who "have everything," pair the fingerprint card with a donation made in their name to a children's charity. The card becomes the tangible keepsake representing a meaningful gift.
Beyond Christmas: Year-Round Fingerprint Cards
The fingerprint technique isn't just for Christmas. Once kids master reindeer, they can create fingerprint cards for every occasion:
- Valentine's Day: Red thumbprints become hearts with simple additions
- Easter: Pastel thumbprints become bunnies, chicks, or Easter eggs
- Mother's Day/Father's Day: Fingerprint flowers or family portraits
- Birthdays: Thumbprint balloons or birthday cakes with candles
- Thank you cards: Any design works with "Thank You" written below
The same supplies (cardstock, ink pads, markers) work for all occasions, making this a year-round skill that keeps giving.
More Easy Christmas Card Crafts for Kids
If your children enjoyed making fingerprint reindeer cards, they'll love these other easy Christmas card ideas designed for young crafters:
- Pop-Up Christmas Tree Card — Impressive 3D card for older kids with patience
- Watercolor Christmas Cards — Beautiful painted designs for artistic children
- Washi Tape Christmas Cards — Colorful cards using decorative tape (no-paint option)
- Stamped Kraft Paper Cards — Rustic minimal designs that look professionally made
For more craft projects beyond cards, explore our Christmas crafts for kids collection, which includes everything from simple paper plate projects to more elaborate sewing and building activities.
Each fingerprint card your child makes is a time capsule — a physical record of how small they were at this exact moment. Years from now, you'll all look at these cards and remember not just the Christmas they were made, but the tiny hands that made them. That's the real magic of fingerprint art. Happy crafting!
More Christmas craft ideas
Get weekly DIY projects and craft tutorials delivered to your inbox.