Pop-Up Christmas Tree Card
Surprise your loved ones with a 3D pop-up Christmas tree that springs to life when they open the card. This paper engineering project uses basic cutting and folding to create an impressive effect.
Materials Needed
- Green cardstock (2 sheets, 8.5 x 11 inches)
- Red or white cardstock (1 sheet for the outer card)
- Scissors
- Ruler
- Pencil
- Glue stick
- Small star sticker or gold paper
- Markers, stickers, or stamps for decorating
- Bone folder or butter knife (for clean folds)
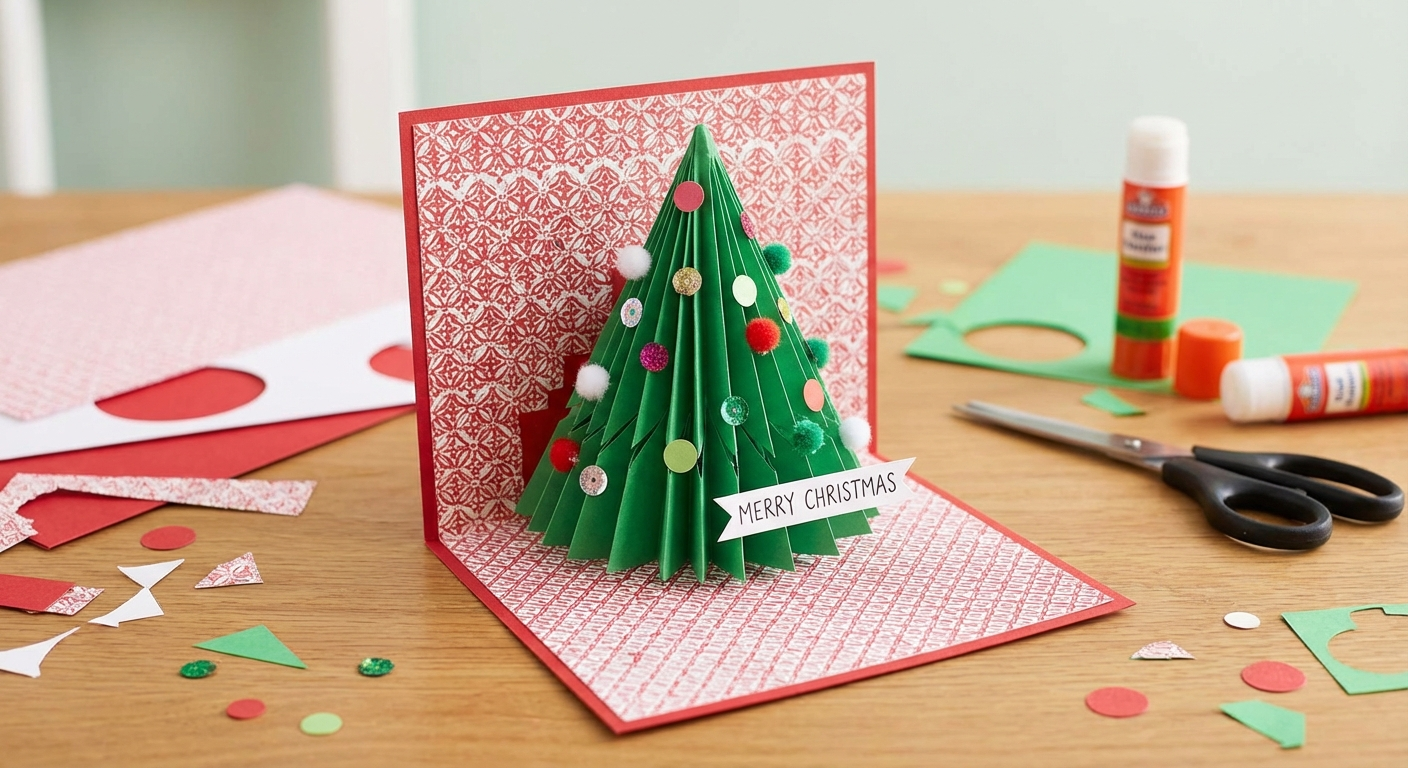
This pop-up Christmas tree card will absolutely delight anyone who receives it. When they open the card, a 3D Christmas tree magically springs to life — it's simple paper engineering that creates a wow moment every time.
Why Pop-Up Cards Make Memorable Christmas Greetings
In a world of text messages and digital holiday greetings, a handmade pop-up card stands out. The 3D pop-up effect transforms a simple piece of cardstock into an interactive experience that recipients actually keep and display year after year.
Unlike flat handmade Christmas cards, pop-up cards have an element of surprise and delight. The moment someone opens the card and sees the tree spring forward is pure magic — especially for children and grandparents who appreciate the time and creativity that went into making something by hand.
This particular design uses a staircase folding technique that's easier than it looks. Once you master the basic concept, you can adapt it to create pop-up snowmen, presents, or even entire winter scenes. If you're just starting with card crafting, you might want to begin with our simpler stamped kraft paper cards before tackling this intermediate project.
How to Make a Pop-Up Christmas Tree Card
Follow these step-by-step instructions to create your own impressive pop-up Christmas card. The entire project takes about 45 minutes, making it perfect for a cozy crafting afternoon.
Step 1: Prepare the Outer Card
Take your red or white cardstock and fold it in half to create the outer card. Use a bone folder or the flat side of a butter knife to press a crisp fold. This will be the card that the recipient sees first and that houses the pop-up mechanism. Set it aside while you work on the tree.
Step 2: Create the Pop-Up Base
Take one sheet of green cardstock and fold it in half. This will form the inner page of the card where the tree will pop up. Make sure this fold is also crisp and clean — the success of your pop-up depends on precise folds.
Step 3: Measure and Cut the Tree Steps
With the green cardstock still folded, use a ruler and pencil to draw horizontal lines on the folded edge. Starting from the bottom, make the first cut 2.5 inches long, the second cut 2 inches long (about 1 inch above the first), the third cut 1.5 inches long (1 inch above the second), and the fourth cut 1 inch long (1 inch above the third).
Each line begins at the folded edge and extends inward. These measurements create a nice graduated tree shape, but you can adjust them slightly if you want a taller or wider tree.
Step 4: Cut Along the Lines
Use sharp scissors to cut along each horizontal line. Do not cut beyond your pencil marks — these cuts only go partway into the folded paper. Cut slowly and carefully for clean edges. Jagged cuts will be visible on the finished tree tiers.
Step 5: Fold the Tree Steps
Open the green cardstock. For each cut, fold the resulting tab forward to create a crease, then fold it back. You are creating bi-directional creases so the tabs can pop inward. Close the card again and carefully push each tab through to the inside.
When you open the card now, the tabs should pop up toward you in a staircase pattern that looks like a tiered Christmas tree. If any tabs don't pop properly, open the card and re-crease them more firmly.
Step 6: Attach to the Outer Card
Apply glue stick to the back side of the green inner page, being very careful not to get glue on the pop-up tabs themselves. Align the fold of the inner page with the fold of the outer card and press them together firmly. Let the glue dry for a few minutes before opening, then test the pop-up mechanism.
Step 7: Decorate the Tree and Card
Add small stickers, drawn ornaments, or tiny glued-on sequins to each tier of the pop-up tree. Place a star sticker or a small star cut from gold paper at the top. Decorate the front of the outer card with a holiday greeting such as "Merry Christmas" or "Happy Holidays."
Draw or stamp snowflakes, holly, or other festive designs around the message. If you enjoyed the stamping technique, check out our stamped kraft paper cards tutorial for more decoration ideas.
Step 8: Write Your Message
Write a personal message on the inside of the card, on either side of the pop-up tree. Be careful not to write on the pop-up tabs themselves, as this can interfere with the mechanism. Keep your message to the flat areas of the card.
Expert Tips for Perfect Pop-Up Cards
Creating successful pop-up cards requires precision and patience. These tips will help you avoid common mistakes and create professional-looking results:
- Practice first: Make your first card from scrap paper to get comfortable with the cutting and folding technique before using your nice cardstock. This saves expensive materials and builds your confidence.
- Sharp scissors are essential: Dull scissors create ragged edges that show on the finished tree tiers. Use sharp scissors and cut slowly for clean, professional results.
- Crease firmly: The pop-up mechanism only works well if the folds are sharp and crisp. Run the bone folder along each crease multiple times until it's razor-sharp.
- Glue placement matters: When attaching the inner page to the outer card, apply glue only to the flat areas. Getting glue on the pop-up tabs will ruin the mechanism and make them stick.
- Test before decorating: Open and close your card several times to make sure the pop-up works smoothly before you spend time adding decorations. Fix any issues first.
- Light decorations only: Heavy embellishments like thick buttons or large stickers can weigh down the pop-up tabs and prevent them from springing properly. Stick with lightweight stickers, drawn designs, or small flat sequins.
Creative Variations for Pop-Up Tree Cards
Once you've mastered the basic 3D Christmas card technique, try these variations to customize your cards:
- Two-tone tree: Use two different shades of green cardstock to make the tree tiers alternate in color for a more dimensional look. Cut every other tier from dark green and the rest from light green.
- Glitter edges: Before assembling, run a glue stick along the edges of each tree tier and dip in fine glitter for a sparkly, festive effect.
- Snow-covered branches: Use white gel pen or white paint pen to add "snow" along the top edges of each tree tier.
- Mini ornaments: Draw tiny ornaments on the tree tiers with colored markers or add small adhesive rhinestones as ornaments.
- Patterned cardstock: Use patterned scrapbook paper for the outer card to create different looks — plaid, snowflakes, or metallic designs all work beautifully.
- Different tree shapes: Adjust the measurements of your cuts to create a tall, skinny tree or a short, wide tree depending on your preference.
Who Will Love These Handmade Pop-Up Cards
Pop-up Christmas cards are perfect for people who appreciate handmade gifts and creative effort. Consider making these cards for:
- Grandparents: They especially treasure handmade cards and often keep them displayed long after the holidays.
- Teachers: A unique thank-you card that shows you put thought and effort into their gift.
- Children: Kids love the surprise and magic of pop-up cards. They'll open and close it repeatedly!
- Long-distance family: A handmade card shows you took time to create something special despite the miles between you.
- Coworkers or neighbors: More personal than a store-bought card, but not overly elaborate for casual relationships.
Troubleshooting Common Pop-Up Card Problems
If your pop-up tree isn't working quite right, here are solutions to common issues:
- Tabs won't pop up: The creases aren't sharp enough. Re-fold each tab more firmly, running your bone folder along the crease several times.
- Tabs stick when opening: You got glue on the pop-up mechanism. Unfortunately, this is difficult to fix. Carefully try to separate the stuck areas, or start over with a new card.
- Tree looks lopsided: Your cuts weren't evenly spaced or weren't perpendicular to the fold. Use a ruler and make sure each cut is perfectly horizontal next time.
- Card doesn't close flat: The decorations are too thick, or the inner page isn't aligned properly with the outer card. Check that the folds line up exactly.
- Paper tears at the cuts: The cardstock is too thin or your cuts extended too far. Use heavier cardstock (65-110 lb weight works best) and don't cut beyond your marked lines.
Packaging and Mailing Pop-Up Cards
Pop-up cards are more delicate than flat cards and require special consideration when packaging:
- Envelope size: Make sure the folded card fits inside a standard envelope without forcing it. An A7 envelope (5.25 x 7.25 inches) works well for a card made from 8.5 x 11 inch cardstock folded in half.
- Protect the mechanism: Remind the recipient to open the card gently. Pop-up cards are delightful but the paper tabs can tear if handled roughly. You might even write "Open carefully!" on the envelope.
- Hand delivery is best: If possible, hand-deliver pop-up cards rather than mailing them. The postal machinery can crush delicate pop-up mechanisms.
- Extra postage: If you must mail, use a rigid mailer or add cardboard backing, and expect to pay extra postage for the thickness. Mark the envelope "Hand Cancel" or "Do Not Bend."
More Handmade Christmas Card Ideas
If you enjoyed making this pop-up Christmas tree card, explore these other handmade Christmas card projects for more creative greeting ideas:
- Watercolor Christmas Cards — Elegant painted designs perfect for artistic crafters
- Washi Tape Christmas Cards — Quick and colorful designs using decorative tape
- Fingerprint Reindeer Card — A sweet project for kids to make for family
- Stamped Kraft Paper Cards — Rustic, minimal designs that look professionally made
For more creative Christmas projects beyond cards, check out our Christmas ornament crafts or easy crafts for kids. Each project is designed to bring joy to both the maker and the recipient. Happy crafting!
More Christmas craft ideas
Get weekly DIY projects and craft tutorials delivered to your inbox.