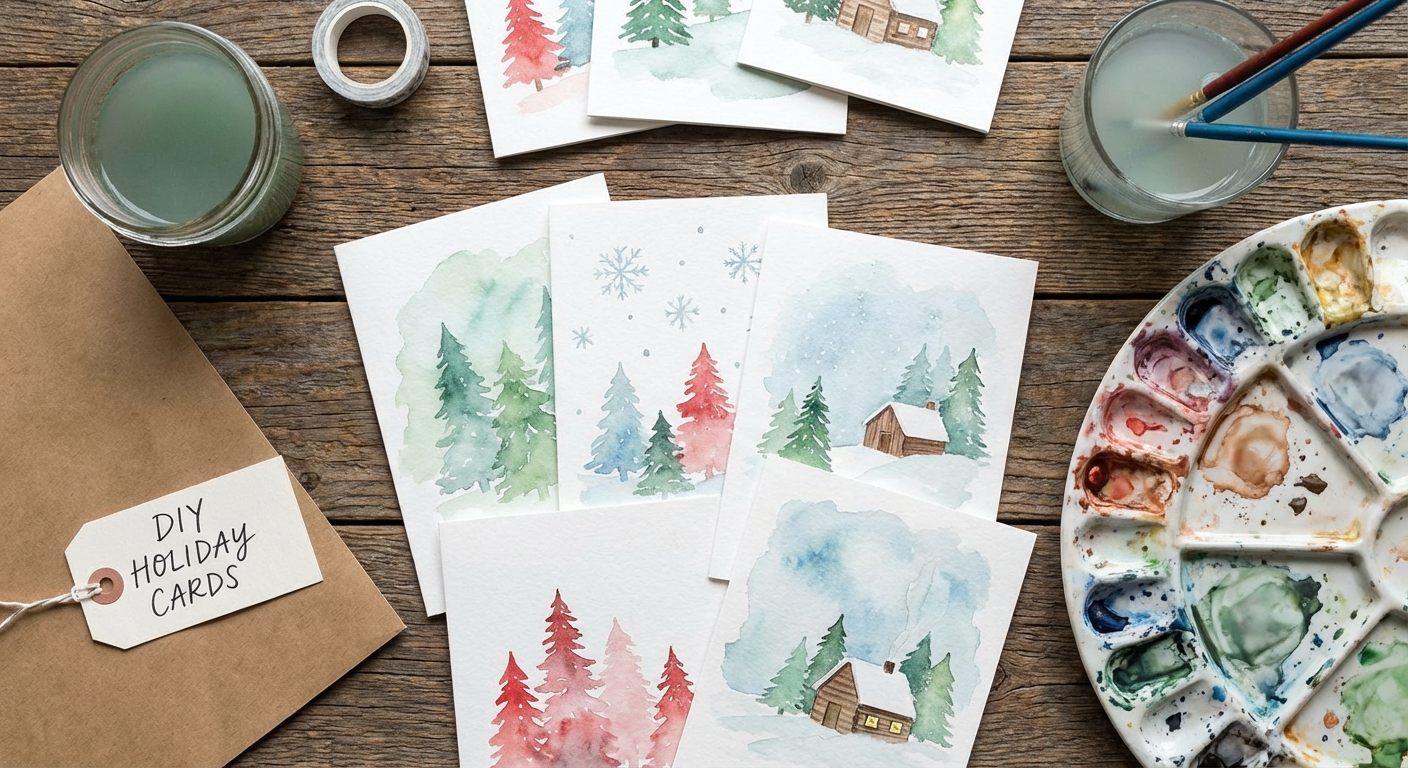
Watercolor Christmas Cards
Paint elegant, one-of-a-kind Christmas cards using simple watercolor techniques. No art experience is needed to create beautiful washes, trees, and snowscapes that will impress everyone on your mailing list.
Materials Needed
- Watercolor paper (140 lb / 300 gsm, cold press recommended)
- Watercolor paint set (a basic pan set with 12 colors is fine)
- Round watercolor brushes (sizes 4, 8, and 12)
- Two cups of clean water
- Paper towels or a clean rag
- Pencil (HB or lighter)
- Ruler
- White gel pen or white gouache
- Masking tape
- Envelopes (A2 or A7 size to match your cards)
- Bone folder or butter knife (for scoring)
Handmade watercolor Christmas cards are one of the most personal and meaningful gifts you can send during the holiday season. Unlike mass-produced cards that get tossed in the recycling bin, a hand-painted watercolor card shows genuine effort and thoughtfulness that recipients treasure and often save for years. The beauty of watercolor is that even simple techniques create stunning, professional-looking results — you do not need formal art training to paint cards that look like they came from a boutique stationery shop.
Watercolor painting is surprisingly forgiving for beginners. The medium naturally creates soft, dreamy effects that suit Christmas subjects beautifully: snowy landscapes, evergreen trees, glowing candlelight, and starry winter skies. Simple washes and basic brush strokes are all you need to create cards that feel both artistic and approachable. The slight imperfections that come with hand-painting actually add to the charm rather than detracting from it.
Making watercolor Christmas cards is also deeply satisfying creatively. It gives you an excuse to slow down during the hectic holiday season, spend a quiet afternoon with paint and paper, and create something beautiful with your own hands. Whether you are painting for a small family mailing list or producing cards for Secret Santa exchanges and teacher gifts, this craft scales beautifully from one special card to batch production of dozens.
Watercolor Christmas Card Design Ideas
The best watercolor Christmas cards embrace simplicity. Simple compositions are easier to execute successfully and often have more visual impact than complicated, busy designs. Here are design ideas that work beautifully in watercolor and suit a range of skill levels:
Single evergreen tree: A classic Christmas subject that works at any skill level. Paint a simple triangle shape in varying shades of green, add a brown trunk, and finish with white snow on the branches and a star on top. The soft watercolor washes create natural depth without requiring advanced shading techniques.
Winter forest landscape: Paint a row of evergreen trees in silhouette against a colorful sunset or twilight sky. The background wash can blend from warm oranges and pinks at the horizon to deep blues and purples at the top. The trees themselves are painted as simple dark green shapes once the background is dry.
Wreath: A circular arrangement of evergreen branches works wonderfully in watercolor. Use varying shades of green for the foliage, add small red dots for berries, and finish with a painted ribbon bow. The organic, loose quality of watercolor makes wreaths look lush and natural.
Snow-covered village or church: Simple geometric shapes representing houses or a church steeple create a charming winter scene. Paint the buildings in soft grays and browns, add snow on the rooftops with white paint, and surround with falling snowflakes.
Abstract snowscape: For a minimalist, modern look, paint abstract hills in soft blues and grays with white space representing snow. Add a few pine trees or just suggest them with minimal brush strokes. This design works especially well for friends who prefer contemporary aesthetics.
Christmas ornaments: Paint one, two, or three hanging ornaments in jewel tones — ruby red, emerald green, sapphire blue — against a soft neutral background. Add metallic highlights with a gold or silver gel pen for extra elegance.
For more Christmas card ideas, explore our full collection of handmade card techniques that pair beautifully with watercolor designs.
Common Watercolor Mistakes and How to Avoid Them
Understanding common watercolor pitfalls saves frustration and helps you produce better cards from the very first attempt. Here is what to watch out for:
Using too much water: The most common beginner mistake is over-diluting the paint until colors look washed out and weak. Use enough water to let paint flow, but not so much that you lose color intensity. Test your mixture on scrap paper first — the color should look slightly darker when wet and will dry lighter.
Working on wet layers: Touching wet paint with more wet paint creates muddy, blended messes unless that is the effect you want. Wait for each layer to dry completely (truly dry, not just touch-dry) before adding the next. A hair dryer on low speed is your friend for speeding up drying time between layers.
Using cheap paper: Regular printer paper buckles and warps when it gets wet, and the paint soaks through instead of sitting on the surface. Invest in proper watercolor paper (140 lb weight minimum). The paper makes more difference to your final results than expensive paint does.
Overworking the paint: One of the hardest watercolor lessons is learning when to stop. Every additional brush stroke lifts color and can make the painting muddy. Lay down your color decisively, then let it be. Fight the urge to fuss and fiddle.
Dirty water: Rinsing your brush thoroughly between colors prevents accidental color contamination. Use two water cups — one for initial rinse, one for final clean water. Change the water frequently, especially when switching from dark to light colors.
Pencil lines too dark: Heavy pencil marks will show through watercolor and cannot be erased once paint is applied. Sketch with the lightest possible touch, or use a hard pencil (2H or 3H) that makes fine, faint lines.
Instructions
Step 1: Prepare the Card Blanks
Cut watercolor paper to your desired card size. A standard folded card is about 5 by 7 inches when open, folding to 3.5 by 5 inches. Score the fold line gently with a bone folder and ruler so the thick paper folds cleanly. Alternatively, paint on a flat piece and mount it onto a pre-made card blank later.
Step 2: Tape Down the Borders
Use masking tape to frame a clean border around each card (about 1/4 inch from each edge). Press the tape down firmly so paint will not bleed underneath. This creates a crisp white border that gives the finished card a polished, professional appearance.
Step 3: Sketch a Light Outline
Using a very light pencil, sketch your design. Simple subjects work best: a single Christmas tree, a row of evergreens, a wreath, an ornament, or an abstract snowy hillscape. Keep the lines faint so they will not show through the paint.
Step 4: Paint the Background Wash
Wet the entire painting area with clean water using your large brush. While the paper is still damp, drop in soft background colors. For a night sky, use deep blues and purples. For a snowy scene, use pale blues and grays. Let the colors blend naturally on the wet surface. This is called the wet-on-wet technique and creates beautiful, soft gradients.
Step 5: Paint the Main Subject
Let the background dry completely (about 10 to 15 minutes, or use a hair dryer on low). Using a smaller brush, paint your main subject with more concentrated color. For a Christmas tree, start at the top with short strokes and widen toward the base. Use varying shades of green to add depth. For a wreath, paint a circular shape of green and add small red dots for berries.
Step 6: Add Details
Once the main subject is dry, add fine details. Use a small brush for things like tree trunk lines, ornament highlights, or individual pine needles. A white gel pen or a small brush loaded with white gouache is perfect for adding snowflakes, snow on branches, or stars in a night sky.
Step 7: Remove Tape and Finish
Peel the masking tape away slowly at a low angle once the paint is fully dry. Write your holiday greeting on the inside of the card, or leave it blank for a personal handwritten message later. Slip the card into a matching envelope.
Tips for Beautiful Results
- Embrace imperfection: Watercolor is unpredictable, and that is its charm. Small blooms and uneven washes add character and make each card unique. The handmade quality is the entire point — recipients treasure these imperfections.
- Color mixing: Mix your greens from blue and yellow for more natural, varied tree colors rather than using green straight from the pan. Mixing your own greens creates depth and interest that pre-mixed greens cannot match.
- Dry completely between layers: Rushing causes muddy colors. Patience between layers is the single most important watercolor technique. Use a hair dryer on low to speed up drying time without damaging the paper.
- Mass production trick: Paint all the background washes on every card first, then go back and add the main subjects to all of them, then details. Working in stages is faster than completing one card at a time and creates visual consistency across your card set.
- Test colors first: Keep a scrap of the same watercolor paper nearby to test colors and brush strokes before committing to your card. This five-second test saves ruined cards and wasted effort.
- Postage note: Handmade cards may be slightly heavier or thicker than standard cards. Weigh a finished card with its envelope at the post office to confirm postage before mailing the whole batch.
- Protect your work: Watercolor is not waterproof once dry. If mailing in rainy weather, place cards in a protective plastic sleeve inside the envelope to prevent smudging if the envelope gets wet.
- Sign your work: Add a small signature or initial on the back of the card. Years from now, recipients will appreciate knowing who created the beautiful card they saved.
Why Handmade Cards Matter
In an age of instant digital messages and quickly scrolled social media posts, a hand-painted Christmas card is a radical act of care. It says you thought about the recipient long enough to sit down with paint and paper and create something specifically for them. That investment of time and attention means more than any store-bought card ever could.
Handmade watercolor cards also support the lost art of correspondence. Receiving physical mail that is not a bill or advertisement has become genuinely rare and special. A beautiful card gives people something tangible to display on their mantel, pin to a bulletin board, or tuck into a memory box. Years later, finding one of your hand-painted cards in a box of keepsakes will bring a flood of warm memories.
For children, making watercolor Christmas cards teaches patience, fine motor skills, and the satisfaction of creating something beautiful from basic materials. It is a screen-free activity that produces a real, physical result they can be proud of. Grandparents especially treasure cards painted by grandchildren — these become family heirlooms far more valuable than any mass-produced greeting.
If you enjoy creating handmade Christmas items, explore our collection of DIY Christmas ornaments and creative gift wrapping ideas to make your entire holiday gift-giving more personal and thoughtful. Handmade traditions create the memories that define Christmas for families.
More Christmas craft ideas
Get weekly DIY projects and craft tutorials delivered to your inbox.