Christmas Gift Wrapping Crafts
Creative and eco-friendly ways to wrap your presents.

Tips for Gift Wrapping Success
Invest in Good Scissors
Sharp scissors make cleaner cuts and straighter lines. Dull scissors tear paper and create frustration. Dedicated wrapping scissors kept away from the kids are worth their weight in gold. Consider spring-loaded scissors if you are wrapping many gifts — your hand will thank you.
Double-Sided Tape is Magic
No visible tape lines means cleaner, more professional results. Worth the extra cost. Apply tape to the paper first, then position and press — this gives you control over placement. Keep regular tape nearby for emergencies, but reach for double-sided first.
Use Natural Elements
Sprigs of rosemary, cinnamon sticks, dried orange slices, pinecones, or fresh evergreen add texture, scent, and seasonal charm. Forage from your yard or buy bundles at craft stores. These natural toppers turn simple kraft paper into boutique-worthy presentations.
Coordinate Colors
Pick 2-3 colors and stick with them across all gifts for a cohesive, Instagram-worthy pile under the tree. This year try burgundy and blush, classic red and gold, or modern black and copper. Consistency looks intentional and sophisticated.
Measure Twice, Cut Once
Nothing wastes paper faster than cutting too short and having to start over. Leave at least 2-3 inches of overlap on all sides. Better to trim excess than scramble for a patch. A wrapping paper cutter makes straight lines effortless.
Create a Wrapping Station
Gather all supplies before you start: paper, scissors, tape, ribbon, gift tags, and decorations. Clear a large flat surface — the floor works great for big boxes. Having everything within reach makes the process enjoyable instead of frustrating.
Master the Basic Box First
Before tackling odd shapes, perfect your rectangular box technique. Crisp corners, smooth paper, centered seams. This foundation makes everything else easier. Practice on shoe boxes until your folds are sharp and tape is invisible.
The Diagonal Wrap for Fabric
When using fabric or furoshiki cloths, place the box diagonally on the fabric. Bring opposite corners to the center and tie in a knot, then wrap remaining corners for a beautiful gathered effect. YouTube tutorials demonstrate this better than any written instructions.
Think Beyond Paper
Maps, sheet music, newspaper comics, children's artwork, fabric remnants, scarves that become part of the gift — all make unique wrapping materials. A vintage map wrapped gift with twine is memorable. A present wrapped in a kitchen towel gives two gifts in one.
Tag Placement Matters
Attach tags to ribbons or bows rather than taping directly to paper. This allows repositioning if needed and looks more polished. Handwrite tags in your best penmanship or use stamped kraft tags for a cohesive look.
Odd Shapes Need Solutions
For bottles, use fabric or tissue in a bag. For balls, cellophane and ribbon. For truly weird shapes, boxes become your friend — or embrace the oddness with creative wrapping that follows the contours. Cookie tins and decorative containers solve many problems elegantly.
Add a Topper Last
Attach bows, dried flowers, ornaments, or other dimensional toppers after the paper is perfectly smooth. This hides any imperfections and draws the eye to something beautiful. A small ornament that becomes an extra gift is a lovely touch.
Common Materials You'll Need
- ✓ Kraft paper or butcher paper (matte finish hides tape better)
- ✓ Fabric scraps or furoshiki cloths in various sizes
- ✓ Twine, ribbon, and yarn in coordinating colors
- ✓ Stamps and ink pads for personalized designs
- ✓ Fresh or dried greenery (rosemary, eucalyptus, evergreen sprigs)
- ✓ Dried orange slices, cinnamon sticks, and pinecones
- ✓ Gift tags — handmade, kraft, or printed
- ✓ Sharp scissors dedicated to wrapping
- ✓ Double-sided tape and regular tape
- ✓ Tissue paper in coordinating colors
- ✓ Reusable fabric gift bags in various sizes
- ✓ Decorative washi tape for accents
- ✓ Hole punch for threading ribbon through tags
- ✓ Ribbon curler tool (or use scissors blade)
- ✓ Self-healing cutting mat for precision cuts
- ✓ Metal ruler or T-square for straight edges
- ✓ Paper cutter or rotary cutter for bulk cutting
- ✓ Small ornaments to use as toppers
- ✓ Wrapping paper storage container to prevent creasing
Gift Wrapping Projects

Furoshiki Fabric Gift Wrapping
Learn the Japanese art of furoshiki to wrap gifts beautifully in reusable fabric. This eco-friendly technique eliminates paper waste and turns the wrapping itself into part of the gift.
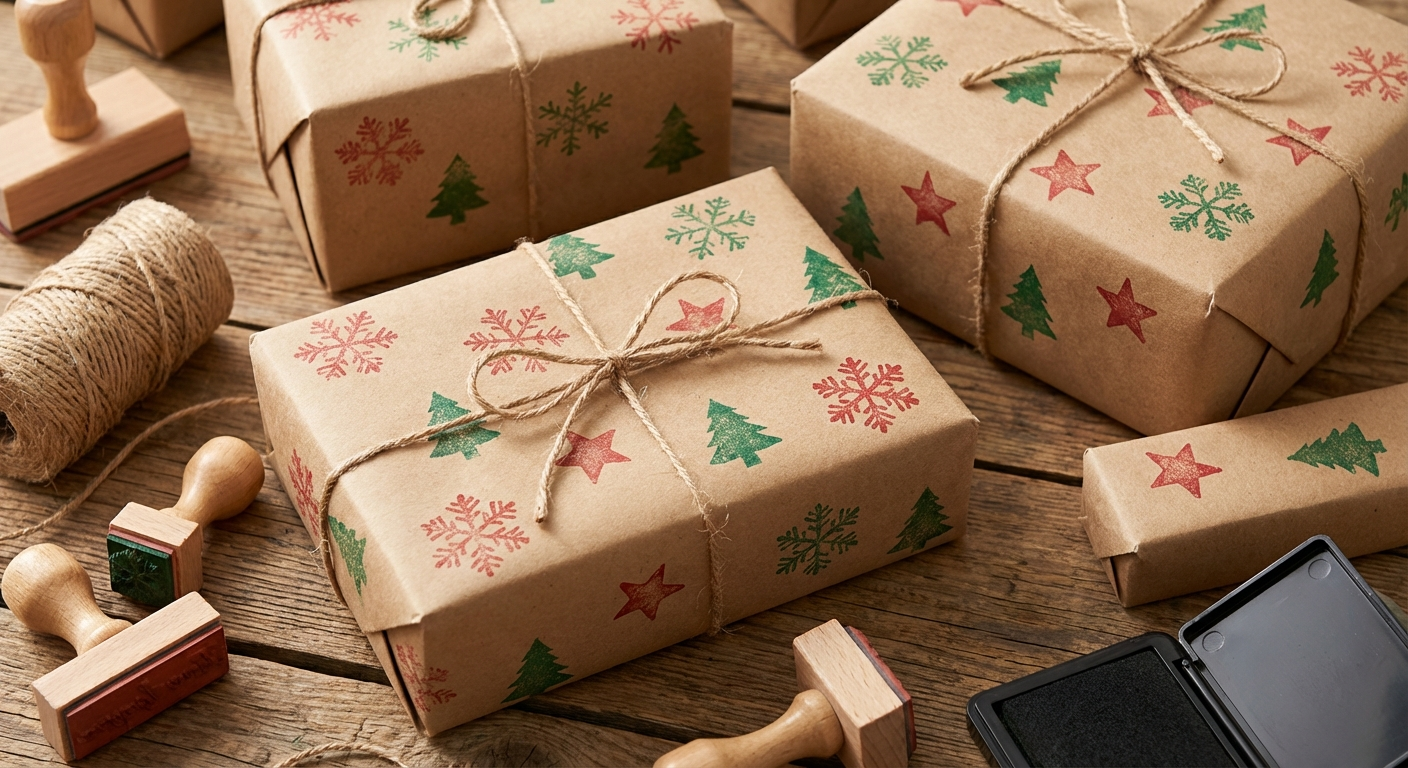
Stamped Brown Paper Wrapping
Transform plain brown kraft paper into charming, custom gift wrap using simple stamps and ink. This budget-friendly technique creates a rustic, handmade look that is surprisingly elegant.
Why Make Your Own Gift Wrapping?
How a gift is wrapped builds anticipation and shows care before a single piece of tape is removed. A beautifully presented package makes the recipient feel special, valued, and considered. That moment of "wow, this is almost too pretty to open" is a gift in itself. Your wrapping communicates: I took time for you. I thought about you. You are worth my effort. Creative wrapping also reduces waste — a choice that matters now more than ever. Skip the glossy, non-recyclable paper with microplastics and glitter in favor of kraft paper, newspaper, old maps, or fabric that can be reused. Some families keep a collection of fabric wraps that circulate through the generations, each one carrying its own memories. The cloth that wrapped Grandma's present in 1998 now wraps presents for her great-grandchildren. Try doing that with disposable paper. DIY wrapping saves real money, especially for large families or friend groups. Basic kraft paper costs a fraction of printed rolls. Fabric remnants from craft stores cost pennies. Natural decorations foraged from your yard cost nothing but add priceless charm. That money you save on wrapping? It can go toward the gifts themselves — or toward more hot cocoa for your wrapping sessions. The process itself becomes a ritual. Some people wrap gifts solo with a holiday movie playing, enjoying the quiet creativity. Others host wrapping parties, turning a chore into a celebration. Families pass down techniques: "This is how Grandpa taught me to make a perfect corner." The hours spent wrapping become memories themselves, not just a task to complete. And finally, there's satisfaction in skill mastery. The first time your corners look department-store crisp, the first time someone asks "Did you have that professionally wrapped?" — you'll feel genuine pride. Gift wrapping is a learnable art, and watching your progress from messy tape disasters to elegant presentations is genuinely rewarding. You made that beautiful package with your own hands. That's worth celebrating.
Explore More Christmas Crafts
Find more DIY projects to make your holiday season creative and memorable.
All Craft Categories →Never miss a Christmas idea
Get daily gift guides, recipes, and holiday inspiration delivered to your inbox.