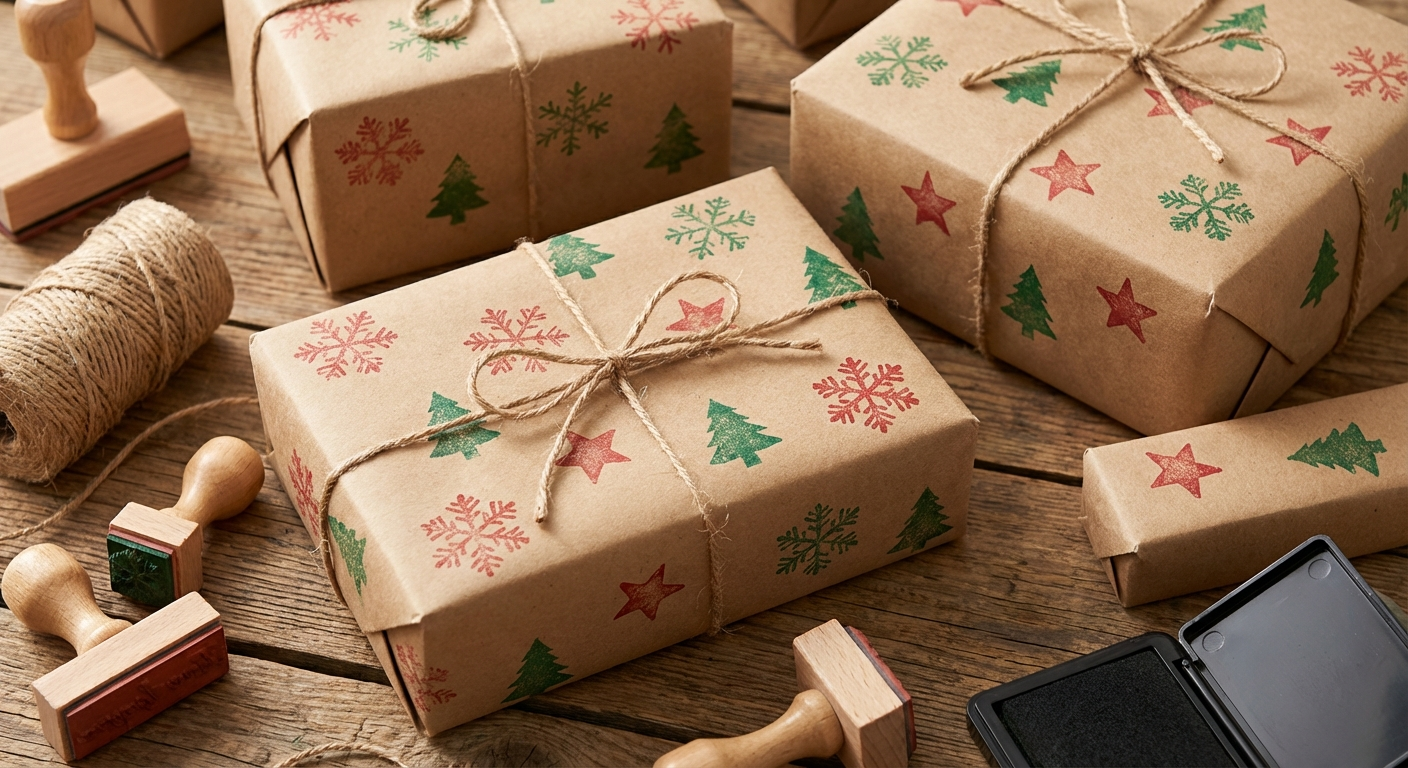
Stamped Brown Paper Wrapping
Transform plain brown kraft paper into charming, custom gift wrap using simple stamps and ink. This budget-friendly technique creates a rustic, handmade look that is surprisingly elegant.
Materials Needed
- Brown kraft paper roll
- Rubber stamps (holiday motifs like snowflakes, stars, trees, holly)
- Ink pads (red, green, white, gold, or silver)
- Homemade stamps: potato halves, wine corks, foam shapes on wooden blocks
- Scrap paper (for test stamping)
- Twine or baker's twine
- Scissors
- Tape
- Fresh greenery sprigs, cinnamon sticks, or dried orange slices (for embellishment)
Why Stamped Brown Paper Makes Beautiful Gift Wrap
There is something genuinely charming about a gift wrapped in hand-stamped brown paper. It looks intentional, personal, and surprisingly elegant — the kind of wrapping that makes people pause before tearing it open. The rustic kraft paper paired with carefully stamped designs creates a farmhouse-meets-boutique aesthetic that store-bought wrapping paper simply cannot replicate.
Best of all, this is one of the most budget-friendly gift wrapping techniques you will ever find. A single roll of brown kraft paper costs a few dollars and wraps dozens of gifts. Add a couple of ink pads and some simple stamps — or make your own from potatoes and wine corks — and you have custom wrapping paper for pennies per gift. It is also a fantastic project to do with kids: young children love stamping, and the results look charming even when the spacing is not perfectly even. Pair your wrapped gifts with a matching stamped kraft paper card for a beautifully coordinated presentation.
Instructions
Step 1: Set Up Your Workspace
Unroll a large section of brown kraft paper onto a flat surface and tape down the corners so it does not curl. Lay scrap paper or newspaper underneath to protect your table. Set out your stamps and ink pads within easy reach. If you are working with children, cover a wider area than you think you need — enthusiastic stampers tend to work beyond the boundaries of the paper.
Step 2: Plan Your Design
Decide on a stamping pattern before you start. Here are the most popular options:
- All-over repeating pattern — Stamps placed in a grid or scattered randomly across the entire sheet. This is the most forgiving and easiest for beginners.
- Single row of stamps — A line of stamps down the center or along one edge creates a clean, modern look.
- Border pattern — Stamps along all four edges frame the gift beautifully once wrapped.
- Mixed motifs — Combine two or three different stamps (like a snowflake and a tree) for visual variety.
Step 3: Test Your Stamps
Press each stamp into the ink pad and make a few test prints on scrap paper. This helps you gauge how much ink to apply and how much pressure is needed. For homemade potato stamps, blot the cut surface with a paper towel first to remove excess moisture, then press firmly into the ink pad. Wine cork stamps work especially well for polka dot patterns and require almost no prep.
Step 4: Stamp the Paper
Begin stamping your design onto the kraft paper. Press the stamp firmly and evenly onto the paper without rocking it. Lift straight up to avoid smudging. Re-ink the stamp between every one to two impressions for consistent color. Work in rows or scatter the stamps randomly depending on your chosen pattern.
If you are stamping a large batch, work in sections and let each section dry before moving your arms across it. Nothing ruins beautiful stamped paper faster than accidentally dragging your sleeve through wet ink.
Step 5: Let the Ink Dry
Allow the stamped paper to dry for at least 10 minutes before wrapping. Dye-based inks dry faster than pigment-based inks. Test by lightly touching a stamp impression in an inconspicuous area — if it smears, give it more time. Pigment-based inks on non-porous kraft paper can take 20-30 minutes to dry fully.
Step 6: Wrap Your Gift
Cut the stamped paper to size and wrap your gift using your preferred method. Secure with tape on the back and bottom. If you want to hide the tape entirely, use double-sided tape for a cleaner presentation.
Step 7: Add Finishing Touches
Tie twine or baker's twine around the package. Tuck a sprig of fresh pine, a cinnamon stick, or a dried orange slice under the twine for a rustic, aromatic embellishment. You can also attach a handwritten kraft paper gift tag. For an extra-special touch, add a small salt dough ornament as a gift topper — the recipient gets a bonus decoration they can hang on their tree.
Making Your Own Stamps at Home
You do not need to buy commercial rubber stamps to get beautiful results. Homemade stamps add extra character and are a great activity to do with kids before the actual wrapping begins:
- Potato stamps — Cut a potato in half and carve a simple shape (star, tree, heart) into the flat surface using a knife. These are perfect for young children and cost nothing. Potatoes last for one stamping session before they dry out.
- Wine cork stamps — The flat end of a wine cork creates perfect circles for polka dots, berries, or ornament shapes. Glue multiple corks together for a larger stamp.
- Foam shapes — Cut craft foam into shapes and glue onto wooden blocks or bottle caps. These create crisp, even impressions and last for multiple uses.
- Celery stalk stamps — Cut the base off a bunch of celery. The cross-section creates a natural rose pattern that looks stunning in red or green ink.
For families with young children, making stamps together turns gift wrapping into a proper Christmas craft activity. Kids can stamp paper while adults handle the actual wrapping — everyone contributes to the finished presents under the tree.
Color Combinations That Work on Brown Kraft Paper
The warm brown of kraft paper is a neutral canvas that pairs beautifully with many color schemes:
- White ink — Creates the most striking and sophisticated look. White stamps on brown paper have a Scandinavian, minimalist elegance.
- Gold and silver — Metallic inks add glamour without losing the rustic charm. Perfect for adult gift exchanges.
- Classic red and green — Traditional Christmas colors pop beautifully against brown paper.
- Single color — Using just one ink color (especially white or gold) creates a cohesive, intentional look that appears more polished than multiple colors.
Batch Stamping for the Whole Season
The smartest approach is to stamp a large roll of paper all at once and store it rolled up for the entire Christmas season. Set aside an afternoon — perhaps while watching a Christmas movie — and stamp 10-15 feet of paper in one session. Once dry, roll it back up loosely and store in a closet. You will have custom wrapping paper ready to grab whenever a gift needs wrapping, with zero last-minute stress.
This assembly-line approach also means you only set up and clean up once, which saves significant time compared to stamping paper for each individual gift.
Eco-Friendly Wrapping That Looks Beautiful
One of the best things about stamped brown paper wrapping is that it is environmentally friendly. Brown kraft paper, twine, and natural embellishments like pine sprigs and cinnamon sticks are all compostable or recyclable. Unlike glossy, laminated wrapping paper that goes straight to the landfill, kraft paper can go in the recycling bin or compost pile after the gifts are opened.
Pair this wrapping style with our furoshiki fabric wrapping technique for a completely zero-waste approach to holiday gift presentation. Between reusable fabric wraps for some gifts and compostable kraft paper for others, you can have a beautifully wrapped tree with a clear conscience.
Tips for Perfect Results
- Consistent pressure — Press down firmly but do not wiggle the stamp. Inconsistent pressure causes blurry prints.
- Combine techniques — Mix stamping with hand-drawn elements. Use a white paint pen to add simple doodles like dots, swirls, or handwritten words between the stamped images.
- Test everything first — Always do a test stamp on scrap paper before committing to your gift wrap sheet.
- Let kids be imperfect — Slightly uneven stamping from children adds authentic handmade charm. Do not correct their spacing.
- Match your cards — Use the same stamps on kraft paper Christmas cards for a beautifully coordinated gift and card set.
- Store ink pads upside down — Storing ink pads face-down keeps the ink at the surface and gives better impressions.
More Christmas craft ideas
Get weekly DIY projects and craft tutorials delivered to your inbox.