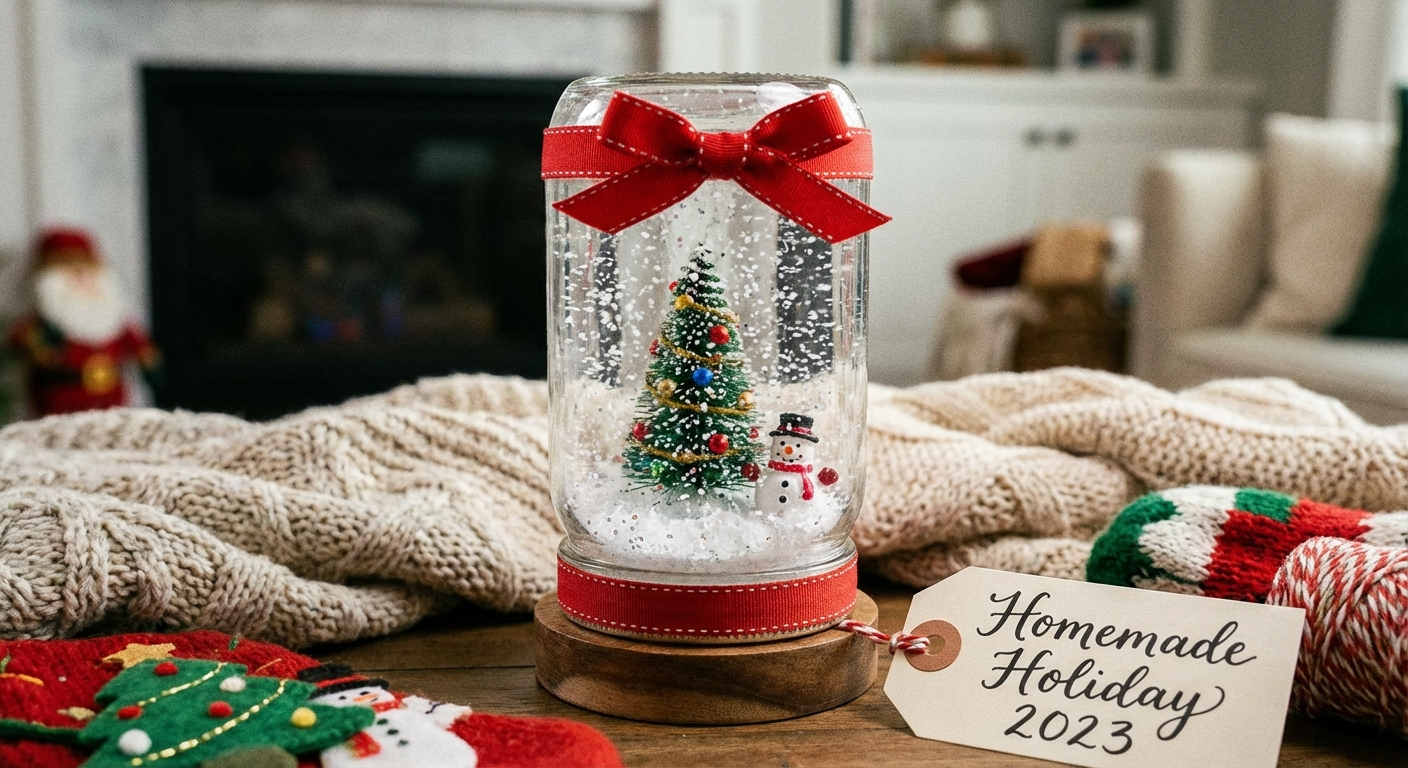
Mason Jar Snow Globe
Turn a simple mason jar into a magical waterless snow globe with miniature figurines and faux snow. This enchanting decoration makes a wonderful centerpiece, mantel display, or handmade gift.
Materials Needed
- Mason jar with lid (pint or quart size)
- Small figurines or miniatures (trees, deer, snowman, houses)
- Faux snow or white glitter
- Hot glue gun and glue sticks
- Epoxy or E6000 adhesive (for a stronger bond)
- Small piece of cardboard or foam board
- White paint (optional, for the lid)
- Ribbon or twine (for decorating the jar rim)
- Bottle brush trees (various sizes)
- Scissors
Mason jar snow globes capture all the magic of traditional glass snow globes but are easier, cheaper, and safer to make at home. These charming DIY decorations create miniature winter wonderlands inside ordinary canning jars, transforming simple craft supplies into enchanting holiday displays. The best part? You can customize every detail — the scene, the colors, the figurines, and the overall aesthetic — to perfectly match your Christmas decor or the recipient's personality if making them as gifts.
Unlike traditional water-filled snow globes that require careful sealing and eventually leak or cloud up, waterless mason jar snow globes use faux snow that stays put and looks perpetually fresh. The dry construction means you never worry about rust, water damage, or mysterious leaks on your furniture. They are also child-safe since there is no breakable glass globe or liquid to spill, making them perfect for families with young children or pets.
These projects are wonderfully scalable — make one special snow globe as a mantel centerpiece, or create a dozen as personalized gifts for teachers, neighbors, or coworkers. Mason jars come in multiple sizes from tiny 4-ounce jelly jars perfect for desk decorations to large half-gallon jars that make dramatic statement pieces. The craft itself takes about 30 minutes per jar once you have your supplies gathered, and the results look far more expensive and sophisticated than the minimal cost would suggest.
Mason Jar Snow Globe Design Ideas and Themes
The scene inside your snow globe sets the entire mood. Here are design approaches that work beautifully in mason jar format:
Classic winter village: Arrange miniature houses, churches, and shops among bottle brush trees dusted with white paint for snow. Add a tiny street lamp for extra charm. This traditional design works well in larger quart or half-gallon jars where you have room for multiple buildings.
Woodland winter scene: Create a forest setting with bottle brush trees in varying heights, miniature deer or woodland animals, and perhaps a small cabin tucked among the pines. Use natural-looking faux snow (white with a slight shimmer) rather than glitter for a more realistic forest floor.
Snowman family: Feature one or more miniature snowmen as the focal point, surrounded by tiny trees and perhaps a small sled or gift boxes. This whimsical design appeals to children and works well in pint-sized jars.
Nativity scene: A miniature nativity makes a meaningful religious snow globe perfect for displaying during Advent or as a Christmas centerpiece. The stable, Mary, Joseph, and baby Jesus arranged with a small star above creates a reverent, beautiful scene.
Retro camper or vintage truck: Miniature red trucks carrying Christmas trees or tiny vintage campers decorated with wreaths create trendy farmhouse-style snow globes. Add bottle brush trees and white snow for a modern nostalgic look that is hugely popular right now.
Single statement piece: Sometimes less is more. A single beautiful miniature — a detailed reindeer, an elegant Christmas tree, or a Victorian-style house — displayed alone with strategic snow placement creates a minimalist, sophisticated snow globe that works in contemporary decor.
For more Christmas decoration ideas to complement your handmade snow globes, explore our complete collection of DIY holiday decor projects.
Finding and Choosing Miniature Figurines
The quality of your snow globe depends heavily on the miniatures you choose. Fortunately, finding affordable, charming figurines is easier than you might think if you know where to look.
Dollar stores and discount retailers: Dollar Tree, Dollar General, and similar stores carry inexpensive holiday miniatures seasonally. Look in the Christmas section for small figurines, trees, and decorative items. Quality varies, but you can often find surprisingly nice pieces for a dollar or less.
Craft stores: Michaels, Hobby Lobby, and Jo-Ann carry dedicated miniature sections with bottle brush trees in many sizes, miniature houses, animals, and seasonal decorations. Watch for their frequent 40-50% off coupons to buy higher-quality pieces affordably.
Model train and hobby shops: These specialty stores sell incredibly detailed miniatures designed for model railroads. HO scale (1:87) and O scale (1:48) work perfectly for snow globes. The quality is exceptional but prices are higher — reserve these for special keepsake globes.
Online marketplaces: Amazon, Etsy, and eBay offer vast selections of miniatures. Search for "miniature Christmas village figures," "bottle brush trees," or "fairy garden miniatures" for hundreds of options. Read reviews carefully and check dimensions before ordering.
Repurposing ornaments: Small Christmas ornaments with the hanging hooks removed work beautifully in snow globes. Tiny glass balls, miniature stockings, and small resin ornaments give you lots of creative options.
Scale consistency is crucial: All figurines in your scene should be proportionally accurate to each other. A tiny one-inch tree next to a three-inch snowman looks wrong. Keep everything in a similar scale for visual cohesion.
Waterless vs Traditional Water-Filled Snow Globes
You have two approaches when making mason jar snow globes, each with distinct advantages:
Waterless (recommended for beginners): Faux snow or glitter rests permanently on the jar bottom, creating a static snowy scene. No shaking, but also no leaking, clouding, or complicated sealing. The scene looks consistently perfect, and the jar can be opened if you want to change the display seasonally. This approach is safer for homes with children and requires less technical skill.
Water-filled traditional globe: Uses distilled water, glycerin, and glitter sealed inside for the classic shake-and-watch-it-snow experience. This creates the most traditional snow globe effect but requires careful waterproofing of the lid seal using silicone caulk. Over time, water can evaporate, cloud up, or leak. The figurines must be waterproof (metal figurines will rust). This approach is best for experienced crafters comfortable with sealing techniques.
For most people making their first mason jar snow globes, the waterless version delivers 90% of the charm with 10% of the hassle. Once you master the basic technique, you can experiment with water-filled versions if you want that interactive shake element.
Instructions
Step 1: Plan Your Scene
Before assembling anything, place your figurines and miniatures inside the jar to see how they fit. Arrange them on the lid (which will become the base when the jar is inverted) and adjust until you are happy with the layout. The scene should have some depth, with taller items in the back and shorter items in front.
Step 2: Prepare the Lid
If the mason jar lid is a standard silver or gold color, you may want to paint it white, red, or green to match your holiday theme. Apply 2 coats of acrylic paint and let it dry completely. If the lid has a two-piece design (flat disc and screw band), work with the flat disc for building the scene.
Step 3: Build the Base
Cut a small circle of cardboard or foam board that fits inside the lid if you need to raise the surface to bring the scene closer to the center of the jar. This is especially helpful with quart-sized jars where the figurines might otherwise sit too low. Glue the circle to the inside of the lid.
Step 4: Attach the Figurines
Using hot glue for lightweight items or E6000 adhesive for heavier pieces, glue each figurine to the top of the lid (or cardboard riser). Press them firmly and hold in place for 30 seconds. Let the glue set for at least 10 minutes before proceeding. Arrange bottle brush trees around larger centerpiece figurines.
Step 5: Add Snow to the Jar
Pour a generous layer of faux snow or white glitter into the bottom of the jar, about 1/4 to 1/2 inch deep. You can also mix in a pinch of iridescent glitter for extra sparkle.
Step 6: Assemble the Globe
Carefully turn the jar upside down and lower it over the scene glued to the lid. Screw the lid ring on to secure the jar. Some snow will fall and settle around the figurines, creating the snowy landscape effect.
Step 7: Decorate the Exterior
Wrap ribbon or twine around the base of the jar (which is now the lid area at the bottom). Tie a bow in the front. You can also hot glue a small sprig of faux holly or a miniature ornament to the ribbon for an extra festive touch.
Common Mason Jar Snow Globe Mistakes
Using too much glitter or faux snow: A thin layer (1/4 to 1/2 inch) looks elegant and lets the scene shine. Piling in several inches buries your figurines and looks cluttered rather than magical.
Weak glue bonds: Hot glue works for lightweight miniatures, but anything with weight needs E6000 or epoxy. If your figurines fall over inside the sealed jar, the entire globe is ruined and must be disassembled.
Not testing the scene before gluing: Always arrange your figurines inside the jar before permanently gluing anything. What looks perfect on the lid might be off-center or poorly positioned once the jar is inverted over it.
Forgetting about visual depth: Placing all figurines at the same height creates a flat, boring scene. Vary the heights with taller items in the back and shorter in front for three-dimensional interest.
Skipping the cardboard riser: In larger jars especially, figurines glued directly to the lid sit too low in the jar with empty space above. A small cardboard or foam riser brings the scene up into the visible sweet spot.
Using rusted or damaged lids: Old canning lids with rust spots or dents look sloppy even when painted. Use new lids for snow globes, or at minimum, lids in perfect condition.
Adding Light to Mason Jar Snow Globes
A small battery-operated LED light transforms a charming snow globe into a magical glowing centerpiece. Here is how to incorporate lighting successfully:
Use warm white fairy lights (battery-operated string lights) rather than single LEDs for even, gentle illumination. Copper wire fairy lights are especially flexible and easy to arrange around your miniatures. Place the battery pack at the bottom of the jar (which becomes the top when inverted) and weave the tiny lights through your scene before gluing figurines in place.
For a cleaner installation, drill a small hole in the metal lid and thread the wire through it, positioning the battery pack outside the jar. This keeps the battery accessible for changing but requires a drill and careful measuring. Seal around the wire with hot glue or silicone to prevent dust from entering the jar.
Timer-operated fairy lights are ideal for snow globes — they turn on automatically each evening for 6 hours, then shut off, so you never have to manually switch them. This feature means your snow globes glow beautifully during evening hours without wasting battery life all day.
Gifting Mason Jar Snow Globes
Handmade snow globes make deeply appreciated gifts because of the obvious time and thought invested. Here is how to present them beautifully:
Wrap the jar rim with coordinating ribbon and tie a bow. Attach a small tag with the year and a brief note about the scene inside. Package larger snow globes individually in tissue paper inside a sturdy box for safe transport. Smaller jars can nestle into baskets with tissue or raffia.
Create themed snow globes personalized for recipients: a miniature camper for friends who love camping, a beach scene with a tiny Santa for snowbird grandparents who winter in Florida, a nativity for deeply religious family members, or hobby-themed scenes that reflect the recipient's interests.
Include a small note explaining that the snow globe is waterless and can be carefully opened if they ever want to change the scene or add their own miniatures. This transforms a static decoration into an interactive keepsake they can personalize over the years.
For more handmade gift ideas that pair beautifully with mason jar snow globes, explore our collection of DIY Christmas crafts and creative gift wrapping techniques.
Tips for Success
- Test before gluing: Always arrange figurines inside the jar before permanently gluing anything to confirm the scene looks good from all angles.
- Use quality adhesive: Hot glue works for lightweight items, but E6000 or epoxy is essential for anything with weight. Let adhesive cure fully before inverting the jar.
- Paint the lid: A coat of white, red, or metallic paint on the lid creates a cleaner, more finished base for your scene than raw metal.
- Consider jar size carefully: Pint jars work for simple scenes with 1-3 small items. Quart jars allow more elaborate villages. Half-gallon jars make dramatic statement pieces but require more figurines to fill the space.
- Create depth with risers: Small cardboard or foam board circles glued inside the lid raise the scene closer to eye level, especially important in taller jars.
- Less glitter is more: A thin, elegant dusting of faux snow looks magical. Too much looks cluttered and hides your carefully arranged scene.
- Group display for impact: Three or four snow globes in varying sizes arranged together on a mantel or dining table creates more visual impact than a single jar.
- Lighted version considerations: Battery-operated LED fairy lights add magical glow but require planning for battery pack placement and access for changing batteries.
- Seal water-filled versions properly: If making traditional water-filled globes, use 100% silicone caulk around the lid seal and let cure 24 hours before inverting. Use distilled water to prevent cloudiness.
- Store carefully: When not displayed, store snow globes upright in their original boxes with bubble wrap or tissue paper to protect figurines from breaking loose.
More Christmas craft ideas
Get weekly DIY projects and craft tutorials delivered to your inbox.