Paper Plate Snowman
Build an adorable snowman from paper plates with this quick and easy craft that is perfect for toddlers and preschoolers. No snow required for this cheerful winter friend.
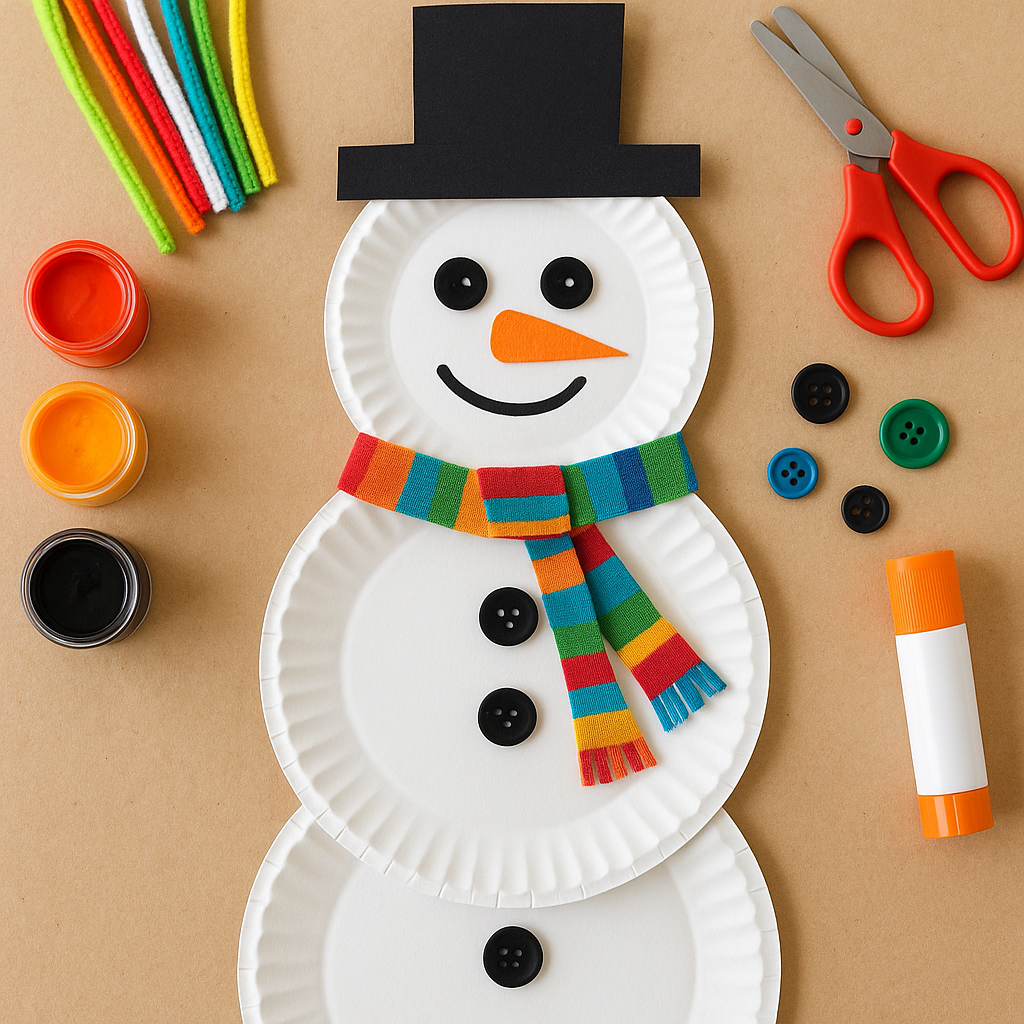
Materials Needed
- 3 white paper plates (different sizes if possible, or trim one smaller)
- Construction paper (black, orange, red, and any other colors)
- Glue stick or white school glue
- Scissors (child-safe for kids, regular for adults)
- Black markers or paint
- Cotton balls (optional, for added texture)
- Buttons (3 to 4 medium-sized, or cut circles from black paper)
- Popsicle sticks or twigs (for arms)
- Yarn or ribbon (for scarf)
- Tape or stapler
This paper plate snowman craft is perfect for toddlers and preschoolers who want to celebrate winter without waiting for snow. Using materials you already have at home, kids can create their own cheerful snowman friend in just 20 minutes.
Why Paper Plate Snowmen Are Perfect for Young Kids
Paper plate crafts are ideal for children ages 3 and up because they offer a large, sturdy surface that's easy for little hands to manipulate. Unlike delicate tissue paper or small cutouts, paper plates are forgiving and don't tear easily, which means less frustration and more creative fun.
This snowman craft for kids teaches basic skills like cutting, gluing, and assembly while allowing room for creativity and personalization. Each child's snowman will look unique, which builds confidence and encourages artistic expression. Plus, there's no "wrong way" to decorate a snowman — whether they give him a silly face or add extra buttons, it's all part of the creative process.
If you're looking for more easy Christmas crafts for kids, this project pairs beautifully with our popsicle stick reindeer for a complete winter crafting session.
How to Make a Paper Plate Snowman
Follow these simple steps to create an adorable paper plate snowman. The entire project takes about 20 minutes from start to finish, making it perfect for classroom activities, rainy day entertainment, or holiday parties.
Step 1: Prepare the Paper Plates
You need three circles in graduating sizes for the snowman's body. If you have three different-sized paper plates, you are all set. If you only have same-sized plates, leave one full size for the bottom, trim about 1 inch off the rim of the second for the middle, and trim about 2 inches off the third for the head.
Step 2: Assemble the Snowman Body
Lay the largest plate on the table. Overlap the medium plate on top of it so the bottom edge of the medium plate covers the top edge of the large plate by about 1 inch. Glue or staple them together. Then overlap the small plate (the head) on top of the medium plate in the same way. You should now have a three-tiered snowman shape.
Step 3: Add the Face
Cut a small triangle from orange construction paper for the nose and glue it to the center of the top plate. Use a black marker to draw two dots for eyes, or glue on small black paper circles. Draw a curved line of small dots for the mouth, forming a smile. Younger children love this step — let them draw silly expressions if they want!
Step 4: Create a Paper Top Hat
Cut a top hat shape from black construction paper: a rectangle for the tall part and a wider strip for the brim. Glue the hat to the top of the head plate. Add a small strip of red paper across the base of the hat for a festive hat band.
Step 5: Add Buttons
Glue 3 real buttons or black paper circles in a vertical line down the middle plate to form the snowman's buttons. Space them evenly. Real buttons add a nice tactile element that kids enjoy.
Step 6: Create Stick Arms
Tape or glue popsicle sticks or small twigs to the back of the middle plate, angling them outward and slightly upward so they look like stick arms. If using paper instead, cut simple twig-like shapes from brown construction paper and glue them to the sides.
Step 7: Add a Cozy Scarf
Cut a strip of red construction paper, felt, or use a piece of yarn or ribbon. Wrap and glue it where the head plate meets the middle plate to create a cozy scarf. Cut small slits in the ends of a paper scarf to create fringe. This is the finishing touch that makes the snowman look complete!
Step 8: Optional Finishing Touches
Glue cotton balls onto the plates to give the snowman a fluffy, snowy texture. Add paper mittens to the ends of the stick arms. Draw or glue on rosy cheeks using pink paper circles or a dab of pink marker. These extra details make each snowman special.
Expert Tips for Crafting with Toddlers and Preschoolers
Working with young children on craft projects requires a little preparation and a lot of patience. Here are our best tips for making this winter craft for kids successful and stress-free:
- Pre-cut for toddlers: For children under 4, pre-cut all the construction paper pieces and let them focus on the gluing and assembly. This keeps the activity moving and prevents frustration.
- Mess management: Use glue sticks instead of liquid glue for younger children. They are easier to control, less messy, and dry faster than bottled glue.
- Set up a craft station: Cover the table with newspaper or a plastic tablecloth. Lay out all materials before you begin so kids can see what they'll be using.
- Let them personalize: Encourage kids to make their snowman unique. Maybe theirs has a silly crooked smile or extra buttons or a colorful striped scarf. There's no "wrong" way to build a snowman!
- Display idea: Tape a loop of yarn to the back of the snowman's hat so it can hang on the wall, door, or refrigerator. Kids love seeing their artwork displayed.
- Write the details: Write the child's name and the year on the back for a keepsake. These crafts become precious memories as kids grow up.
Perfect for Classroom and Party Activities
This paper plate snowman works wonderfully for group settings like preschool classrooms, holiday parties, or playdates. The simple instructions and forgiving materials make it easy for multiple children to work simultaneously without requiring constant adult supervision.
For classroom teachers, prepare individual bags with pre-cut pieces for each child. Include one full-size paper plate, one medium plate, one small plate (pre-trimmed), pre-cut hat pieces, a carrot nose, buttons, and a scarf strip. Let each child assemble their own unique snowman while you circulate to help with gluing and attaching arms.
Pair this activity with other Christmas crafts for kids like our salt dough ornaments or felt Christmas tree ornament for a full day of winter crafting fun.
Creative Variations to Try
Once you've mastered the basic paper plate snowman, try these fun variations to keep the creativity flowing:
- Texture play: Use different materials for the hat and scarf — felt, fabric scraps, tissue paper, or even aluminum foil for a shiny hat. This creates a sensory experience for very young crafters.
- Painted plates: Let kids paint the plates with white paint mixed with glitter for a sparkly snowman. This adds an extra step but creates a magical effect.
- Snowman family: Make multiple snowmen in different sizes to create a snowman family. Use mini paper plates for a baby snowman!
- Hanging ornament version: Use smaller dessert-sized paper plates and add a ribbon loop at the top to turn your snowman into a Christmas ornament for the tree.
- 3D standing snowman: Instead of gluing the plates flat, attach them at right angles using cardboard strips to create a free-standing snowman that can sit on a shelf.
What You'll Learn from This Craft
Beyond creating an adorable winter decoration, this snowman craft for preschoolers teaches valuable developmental skills:
- Fine motor skills: Cutting, gluing, and manipulating small pieces strengthens hand muscles and improves coordination.
- Following directions: Multi-step crafts help kids practice listening and following sequential instructions.
- Spatial awareness: Deciding where to place the face, buttons, and arms teaches spatial planning.
- Creative expression: Choosing colors, expressions, and decorations allows kids to make artistic decisions.
- Patience and persistence: Completing a multi-step project builds confidence and shows kids they can finish what they start.
More Winter Crafts for Kids
If your little ones enjoyed making this paper plate snowman, they'll love these other winter and Christmas craft projects designed for young children:
- Popsicle Stick Reindeer — Another easy craft using materials you have at home
- Handmade Christmas Cards — Simple card designs kids can make for grandparents
- Felt Christmas Tree Ornament — A soft, no-sew ornament perfect for small hands
- Pine Cone Centerpiece — A nature craft that combines outdoor exploration with indoor creativity
Each of these projects is designed with young crafters in mind, using simple materials and straightforward instructions that build confidence while creating something they'll be proud to display or give as gifts. Happy crafting!
More Christmas craft ideas
Get weekly DIY projects and craft tutorials delivered to your inbox.